
【跟着ChatGPT学React】state+props+refs

hokyo
发布于 1 年 之前
1323
组件三大属性(state/props/refs)
这些是我学习的时候最先接触的,可能说组件的三大属性官方是没有这样写的。我只是为了便于个人理解写的。
1 state
本质就是一个变量而已,但是组件一个特殊变量。
React 会进行监控这个变量变化,当 state 发生变化。组件就会重新渲染。
在类组件的 2 种写法
因为有是类组件,所以有 this 的存在。
import React, { Component } from 'react';
/**
 * ========================================
 * 其实这里跟React无关
 * 利用的是ES6的语法 【Class的基本语法】
 * https://es6.ruanyifeng.com/#docs/class
 * !实例属性除了定义在constructor()里面
 * !也可以定义在最顶层
 * ========================================
 */

export default class App extends Component {
  //  方案1:写在构造函数里
  //   constructor(props) {
  //     super(props);
  //     this.state = {
  //       user: { msg: 'hello world', name: 'chin' },
  //     };
  //   }

  //  方案2:直接写在外面最顶层
  state = {
    user: { msg: 'hello REACT!', name: 'CHIN' },
  };

  render() {
    const { msg, name } = this.state.user;

    return (
      <>
        <h2>{msg}</h2>
        <h2>{name}</h2>
      </>
    );
  }
}
state 的值只要改变就一定会被渲染吗?(这里可以参考 setState)
当然不是,React 内部要 diff 对比,2 次值不同。才会通过调用setState()进行重新渲染
- 值要不一样
setState()
什么数据都要写在 state 里面?
对于那种组件内部经常变化的写在 state,其他固定的直接写个实例属性就好。

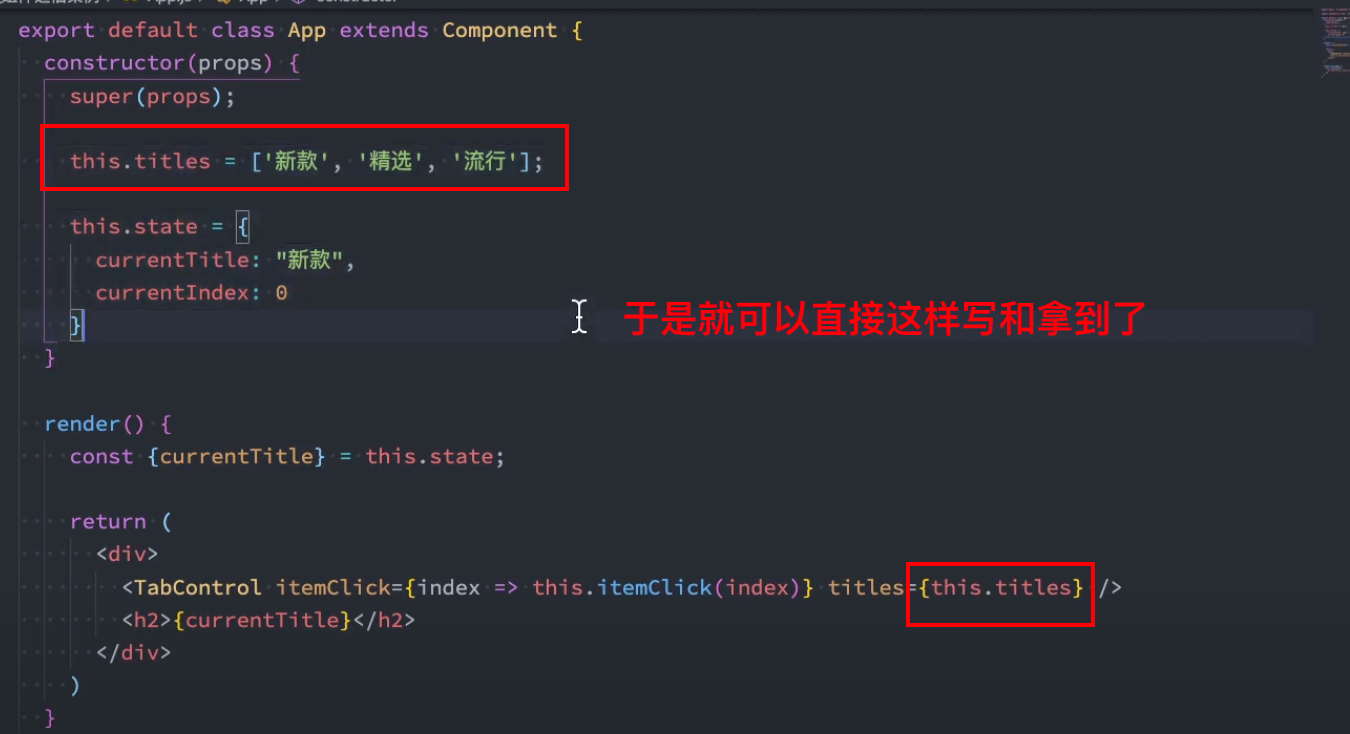
合起来就是这样的意思
数组放在 jsx 里面会自动遍历。

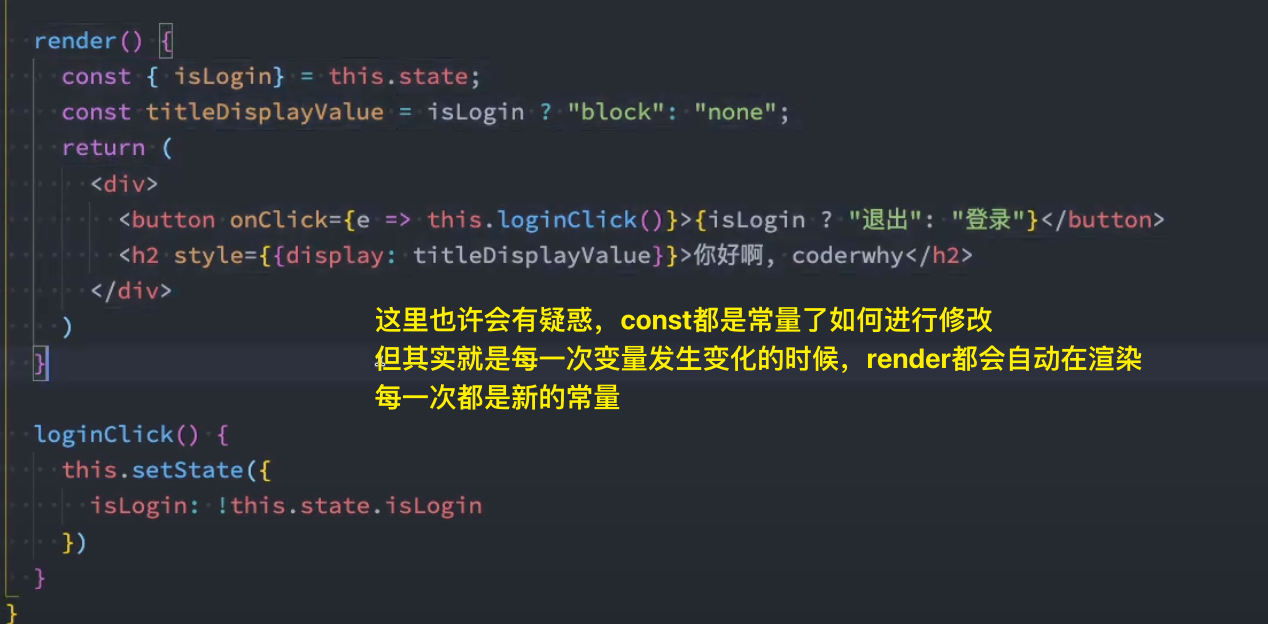
state 为什么可以用 const 写?
其实这个 state 既然是可以变化的,那么应该是 let 才是啊?
其实当通过 setState 去修改一个 state 时,并不表示修改当前的 state,他是修改的是组件下一次渲染时 state 值!⚠️ 也就是每一次渲染都是新的值 ⚠️!
和 setState 关系亲密
因为 state 和 setState 的关系很亲密。所以建议配合 state 一起食用!
在函数式组件里
这个要看 hooks useState()
2 props
主要是用来传递数据用的,React 组件基本的通信是通过 props 来实现的。
props 指向的是一个对象。它包含了父组件中传递的所有参数
this.props.name = 'jack'; //此行代码会报错,因为props是只读的
这里继续详细的看一下 props
props 传递的数据类型
import React, { memo } from 'react';

const App = memo(() => {
  return (
    <div>
      {/* 下面这两种传递的其实都是string 字符串比较特殊 可以2种方式传递都ok*/}
      <Child text="hello react" />
      <Child text={'hello react'} />
    </div>
  );
});

const Child = memo((props) => {
  // 这里传递的是一个string没错
  console.log(typeof props.text);
  const greeting = 'Welcome to newyork';
  return <h1>{greeting}</h1>;
});

export default App;
传递一个对象
import React, { memo } from 'react';

const App = memo(() => {
  return (
    <div>
      {/* 下面这两种传递的其实都是string 字符串比较特殊 可以2种方式传递都ok*/}
      <Child text="hello react" />
      <Child text={'hello yes'} />
      {/* 第1个{} 是用来表示下面是一段js哦,第2个{}才是你要传递的对象 */}
      <Child text={{ obj: 'i am obj' }} />
    </div>
  );
});

const Child = memo((props) => {
  // 然后你会发现这里传递的就是obj了
  console.log(typeof props.text);
  const greeting = 'Welcome to newyork';
  return <h1>{greeting}</h1>;
});

export default App;

// 下面一段
import React, { memo } from 'react';

const App = memo(() => {
  return (
    <div>
      {/* 下面这两种传递的其实都是string 字符串比较特殊 可以2种方式传递都ok*/}
      <Child text="hello react" />
      <Child text={'hello yes'} />
      {/* 第1个{} 是用来表示下面是一段js哦,第2个{}才是你要传递的对象 */}
      <Child text={{ obj: 'i am obj' }} />
    </div>
  );
});

const Child = memo(({ text }) => {
  return <h1>{text.obj}</h1>;
});

export default App;
基本上这就是 React 中 props 从组件传递到组件的方式。您可能已经注意到,props 仅在 React 应用程序的组件层次结构中从上到下传递。没有办法将道具从子组件传递给父组件。我们将在本教程后面重新讨论这个警告。
同样重要的是要注意 React 的 props 是只读的(不可变的)。作为开发人员,你永远不应该改变 props,而只能在你的组件中读取它们。不过,您可以从中派生新值(请参阅稍后的计算属性)。毕竟,props 仅用于将数据从父组件传递给子组件 React。本质上,道具只是将数据沿组件树传输的工具。

父 → 子 传递小 demo
import React, { Component } from 'react';

/**
 * 子组件
 */
class Child extends Component {
  constructor(props) {
    super(props);
    // 这里可以看到父组件传过来的全部参数
    console.log(props);
  }
  render() {
    // 这里也是可以看到的 一模一样
    // console.log(this.props);
    const { msg, info } = this.props;
    return (
      <div>
        <h1>我是子组件</h1>
        <h2>{msg}</h2>
        <h3>{info.id}</h3>
        <h3>{info.hobby}</h3>
      </div>
    );
  }
}

/**
 * 父组件
 */
export default class ParChildClass extends Component {
  constructor(props) {
    super(props);
    this.state = {
      msg: 'hello react',
      info: { id: 'uuid1', hobby: 'swim' },
    };
  }
  //  想把上面的信息传递给Child这个组件
  render() {
    return (
      <div>
        <h1>ParChildClass</h1>
        <Child msg={this.state.msg} info={this.state.info} />
      </div>
    );
  }
}
子 → 父 传递小 demo
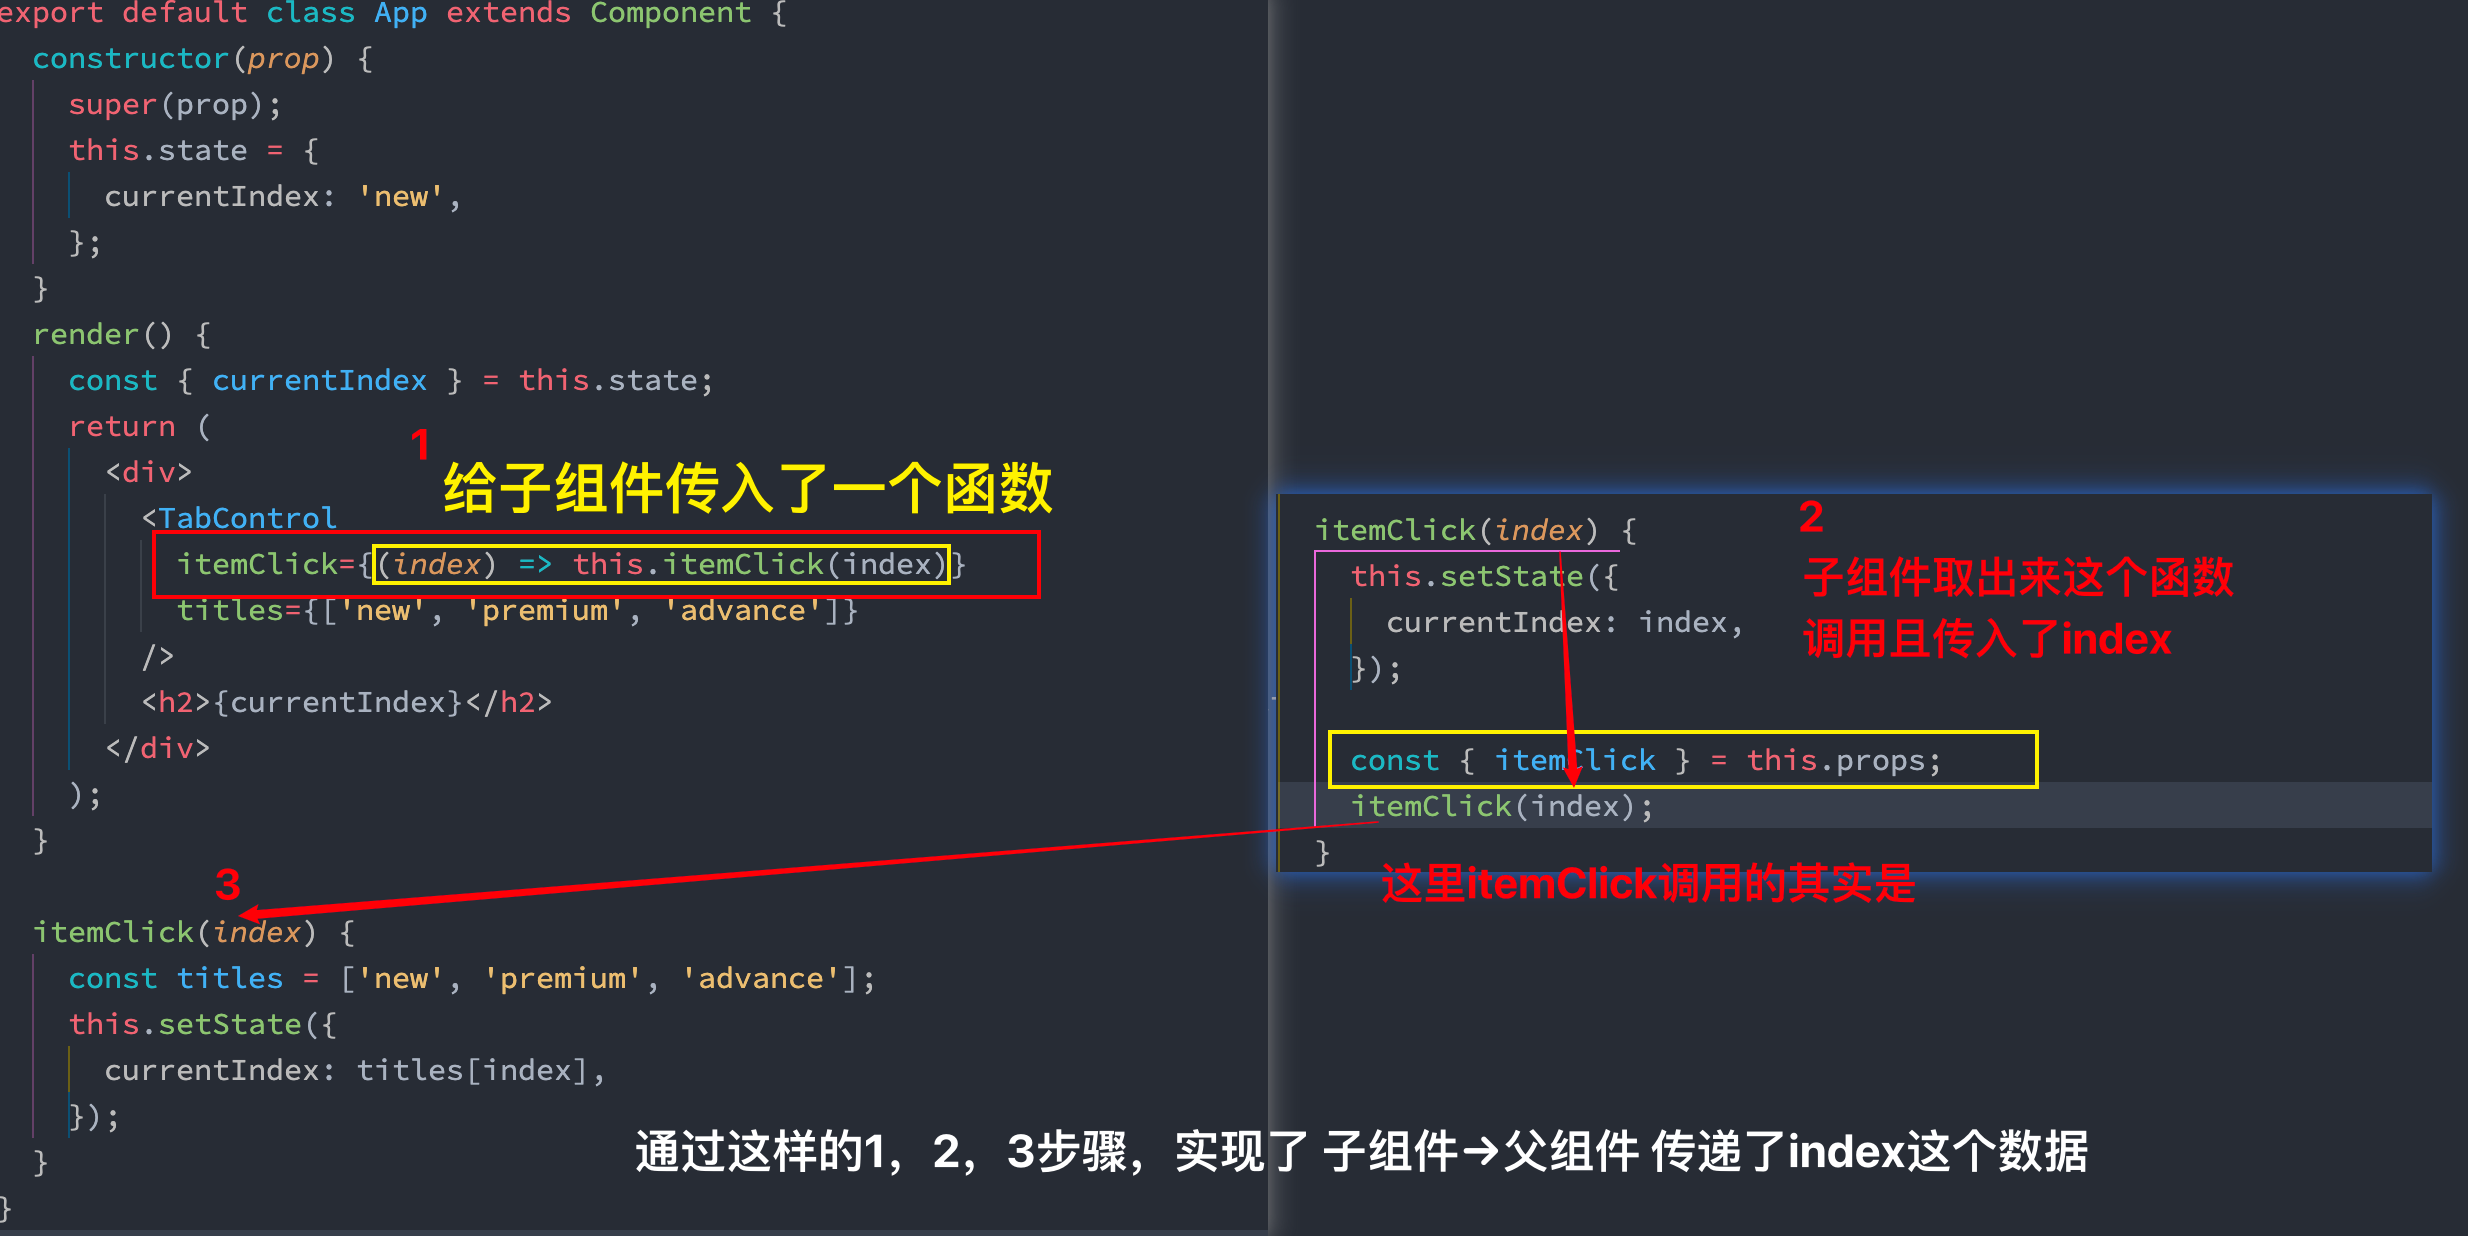
关于父子传递的函数/类组件
下面的代码以后会补充。
详情可以参考一下 codesandbox
一些应用
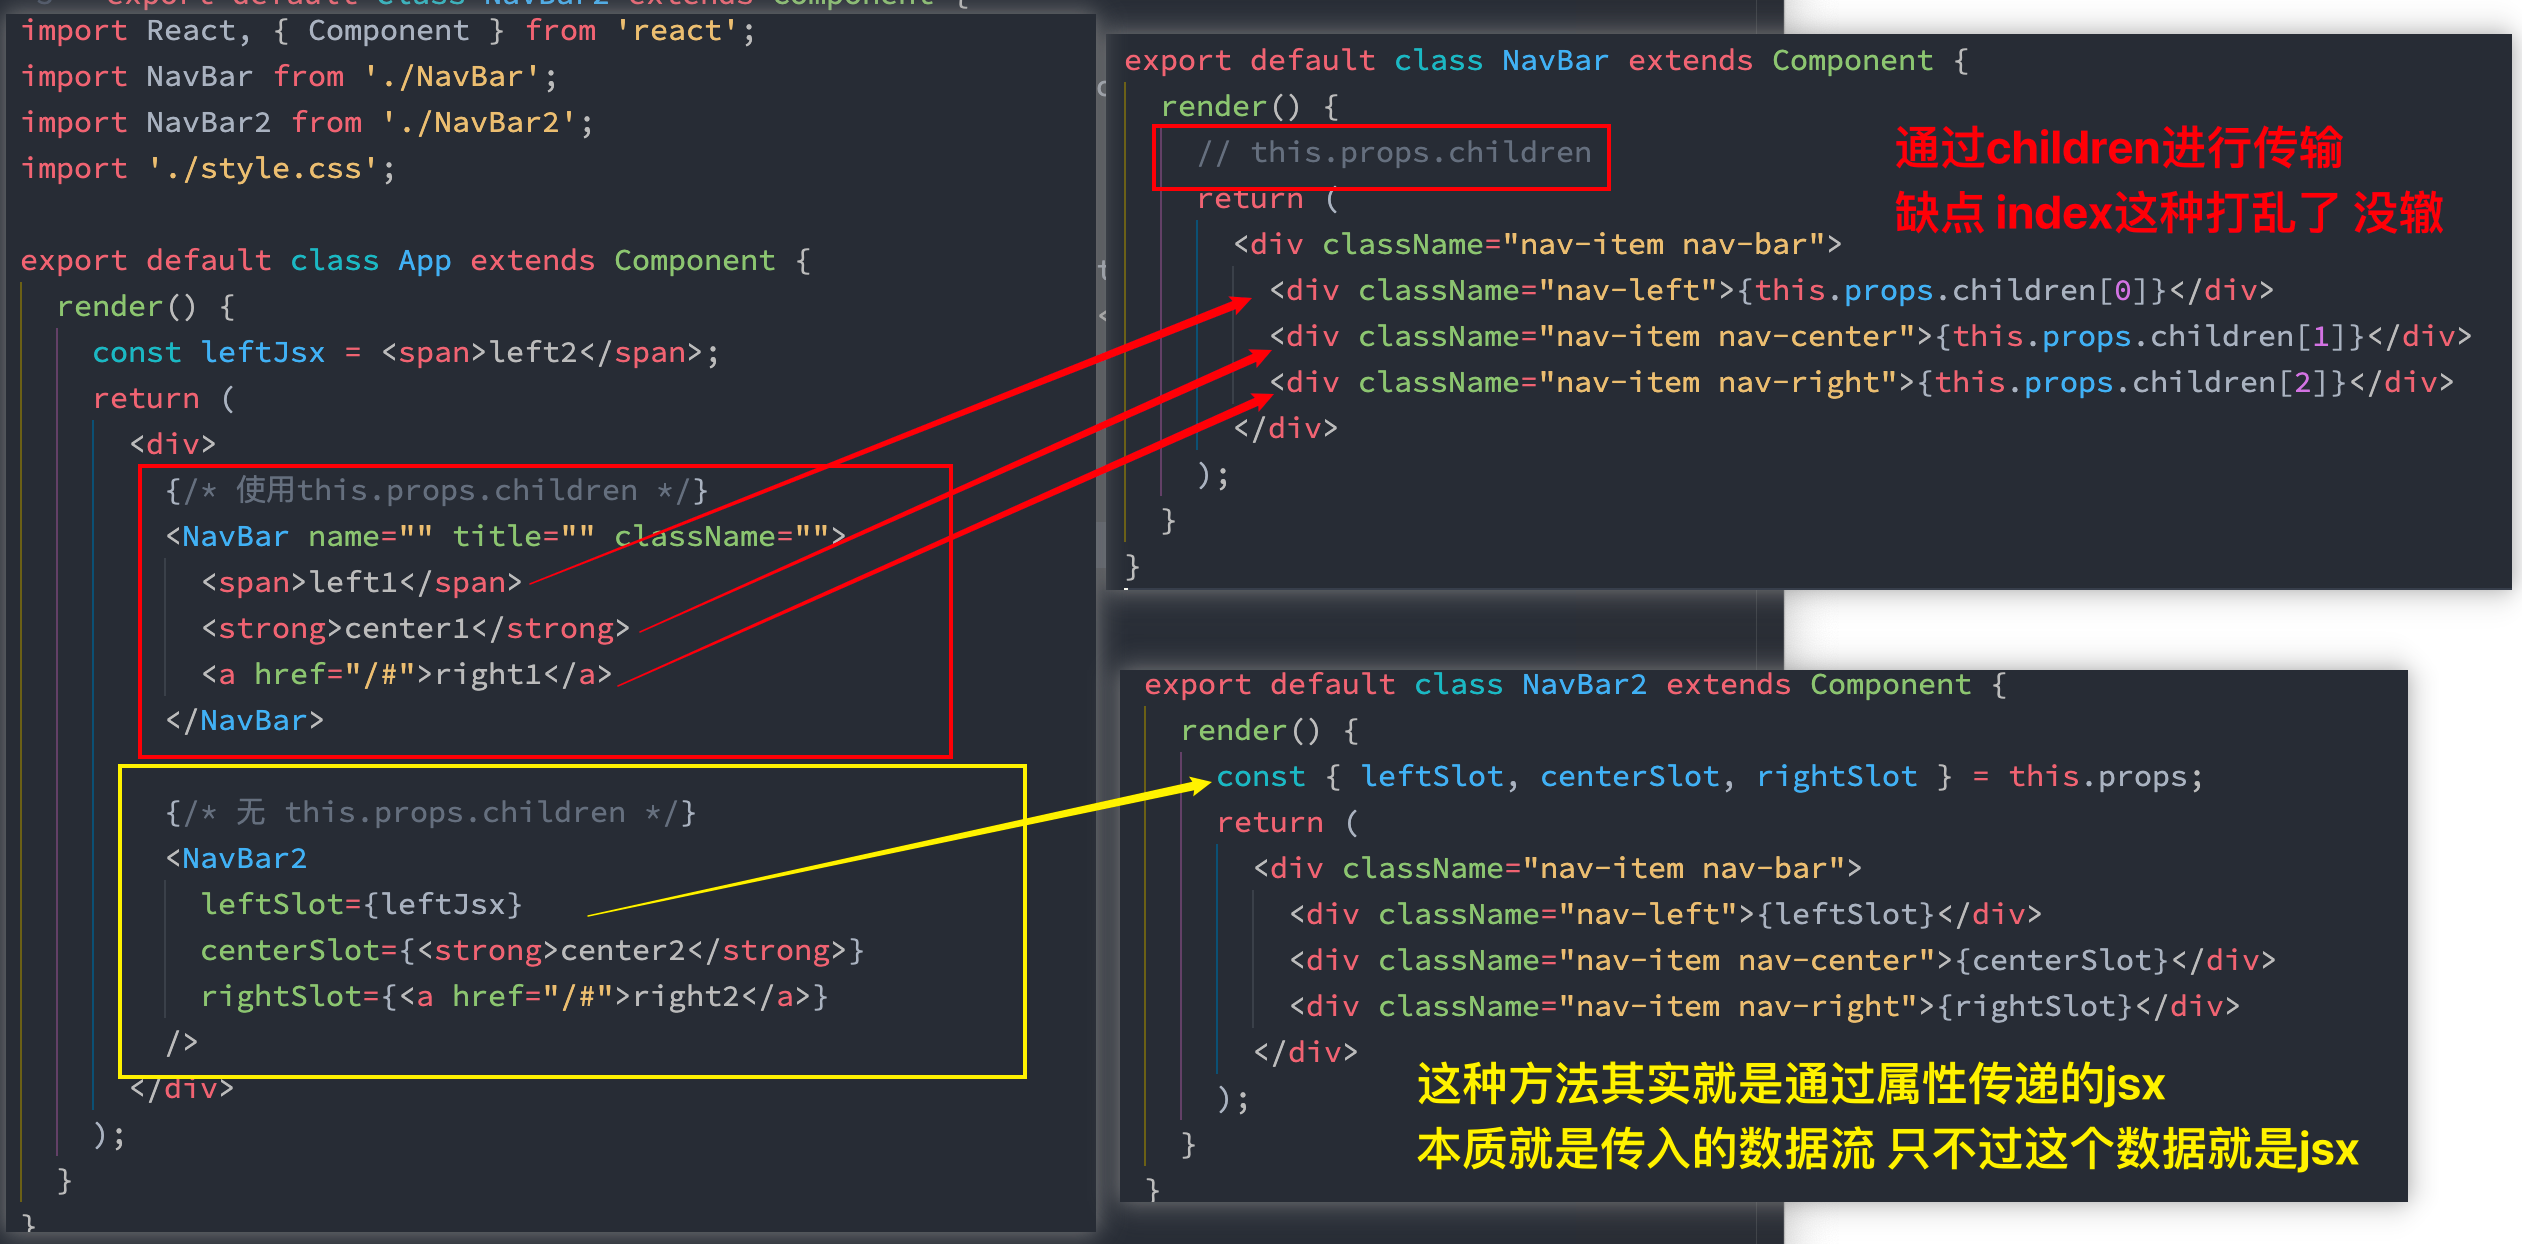
用 react 实现 slot
slot 是什么呢。就是那种一个页面,比如导航栏,看起来都是一样的
左 中 右
但其实内容不一样,共通的结构,不同的细节。
在 vue 里就是用的 slot 实现的,但是 react 里怎么实现呢?
其实本质用的就是props 属性进行传递,只不过传递的是 JSX 数据
3 refs
react 是不推崇直接 DOM 操作的,但是有些时候不避免的也要 dom 操作。这个时候就要用 refs 取得。
Q1:什么是?为什么要用?
组件内的标签可以定义 ref 属性来标识自己 快速定位呗
Q2:取得的是真实的 DOM 还是虚拟的 DOM?
真实的 DOM 可以通过debugger验证
字符串形式 refs
下面是字符串形式的 refs
class Demo extends React.Component {
  showData = () => {
    console.log(this);
    debugger;
    const { input1 } = this.refs; // 复数
  };
  showData2 = () => {
    const { input1 } = this.refs;
  };
  render() {
    return (
      <div>
        <input ref="input1" type="text" value="" />
        <button onClick={this.showData}></button>
        <input ref="input2" onBlur={this.showData2} type="text" value="" />
      </div>
    );
  }
}
注意,根据官网的描述,这个 API 已经快过时了。因为效率不高
过时 API:String 类型的 Refs
过时 API:String 类型的 Refs
如果你之前使用过 React,你可能了解过之前的 API 中的 string 类型的 ref 属性,例如
"textInput"。你可以通过this.refs.textInput来访问 DOM 节点。我们不建议使用它,因为 string 类型的 refs 存在 一些问题。它已过时并可能会在未来的版本被移除。注意
如果你目前还在使用
this.refs.textInput这种方式访问 refs ,我们建议用回调函数或createRefAPI 的方式代替。
回调形式 refs
- 我定义了一个函数
- 我没有调用它
- 它执行了
用这个可以验证,回调函数返回值跟调用者有关。这里返回的就是 a 所在的节点<input ref={(a)=>{console.log(a)}}
所以就可以这样写 ↓<input ref={(curNode)=>{this.input1 = curNode}} type="text" value="" />
这样的结果,就是把 a 所在的节点挂在了 this.input1 上,这里的 this 也就是箭头函数最近的实例 Demo
class Demo extends React.Component {
  showData = () => {
    console.log(this);
    debugger;
    const { input1 } = this.refs; // 复数
  };
  showData2 = () => {
    const { input1 } = this.refs;
  };
  render() {
    return (
      <div>
        <input ref={(c) => (this.input1 = c)} type="text" value="" />
        <button onClick={this.showData}></button>
      </div>
    );
  }
}
回调次数问题
官方说明内联函数问题 → 关于回调 refs 的说明
//  内联形式
{/*<input ref={(c)=>{this.input1 = c;console.log('@',c);}} type="text"/><br/><br/>*/}
<input ref={this.saveInput} type="text"/><br/><br/>
// 绑定形式
saveInput = (c)=>{
    this.input1 = c;
    console.log('@',c);
}
所以下面会有一个非内联的,绑定的。但这两者无关紧要,不用过于纠结。
//创建组件
class Demo extends React.Component {
  state = { isHot: false };
  showInfo = () => {
    const { input1 } = this;
    alert(input1.value);
  };

  changeWeather = () => {
    //获取原来的状态
    const { isHot } = this.state;
    //更新状态
    this.setState({ isHot: !isHot });
  };

  saveInput = (c) => {
    this.input1 = c;
    console.log('@', c);
  };

  render() {
    const { isHot } = this.state;
    return (
      <div>
        <h2>今天天气很{isHot ? '炎热' : '凉爽'}</h2>
        {/*<input ref={(c)=>{this.input1 = c;console.log('@',c);}} type="text"/><br/><br/>*/}{' '}
        内联形式
        <input ref={this.saveInput} type="text" />
        <br />
        <br /> 绑定形式
        <button onClick={this.showInfo}>点我提示输入的数据</button>
        <button onClick={this.changeWeather}>点我切换天气</button>
      </div>
    );
  }
}
createRef()形式 看这个就可以
官方写的很清楚。创建 Refs
要注意,这里的创建方式并不是通过回调函数,而是官方的 API。
创建 myRef = React.createRef()
获取this.myRef.current.value
他的局限性就是,专人专用,一个萝卜一个坑。而且用几个容器就要创建几个,代码稍微要写多点。
//创建组件 class Demo extends React.Component { /* React.createRef调用后可以返回一个容器,该容器可以存储被ref所标识的节点,该容器是“专人专用”的 */ myRef = React.createRef(); myRef2 = React.createRef(); //展示左侧输入框的数据 showData = () => { alert(this.myRef.current.value); }; //展示右侧输入框的数据 showData2 = () => { alert(this.myRef2.current.value); }; render() { return ( <div> <input ref={this.myRef} type="text" placeholder="点击按钮提示数据" /> <button onClick={this.showData}>点我提示左侧的数据</button> <input onBlur={this.showData2} ref={this.myRef2} type="text" placeholder="失去焦点提示数据" /> </div> ); } } //渲染组件到页面 ReactDOM.render(<Demo a="1" b="2" />, document.getElementById('test'));
函数组件 useRefs
这里有一个简单的原生 PKreact 的实现对比
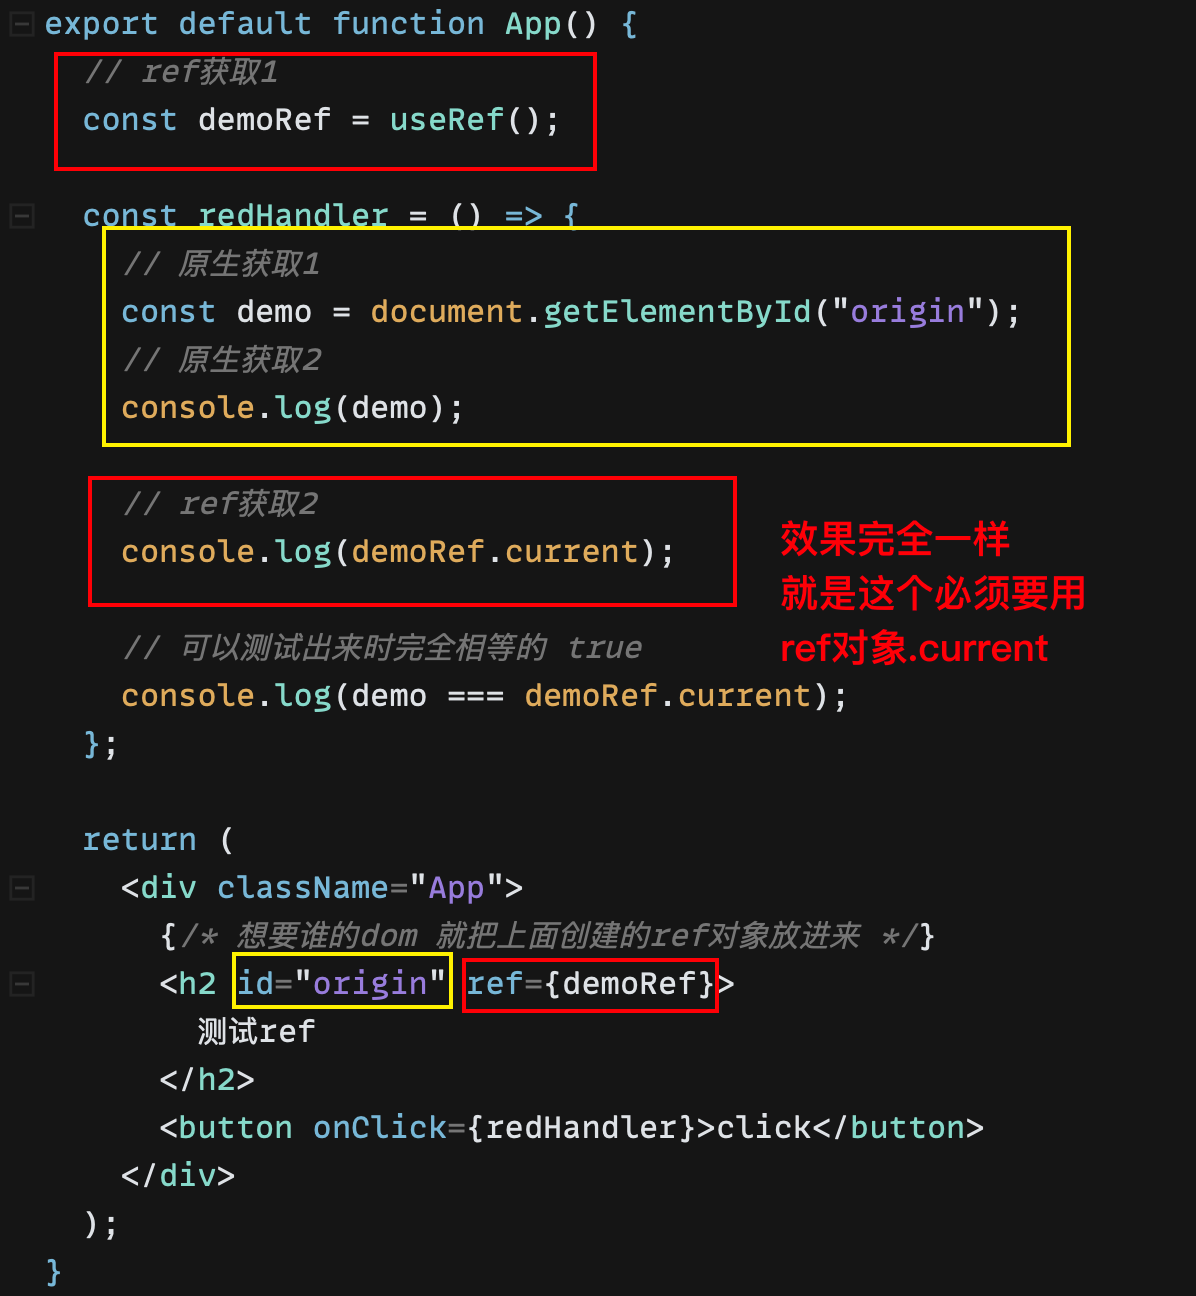
其实这里可以发现
useRef() 返回的就是一个对象{},但是必须要有 current 这个属性
export default function App() {
  // react自己的
  const demoRef = useRef();
  // 自己写一个
  const myRef = {
    current: null
  };

  const redHandler = () => {
    console.log(demoRef.current);
    console.log(myRef.current);
  };

  return (
    <div className="App">
      {/* 想要谁的dom 就把上面创建的ref对象放进来 */}
      <h2 ref={demoRef}>测试ref</h2>
      <button ref={myRef} onClick={redHandler}>
        click
      </button>
    </div>
  );
}
但其实是有区别的!!
- 自己创建的,每次重新渲染都会创建一个新对象。
useRef()都是同一个对象,可以确保每次渲染获取的都是一个对象- 当你需要一个对象不会因为组件的重新的渲染而改变时候,就要用
useRef()
这个时候就需要 ref,比如我想拿到自己组件的元素,想拿到子组件的元素
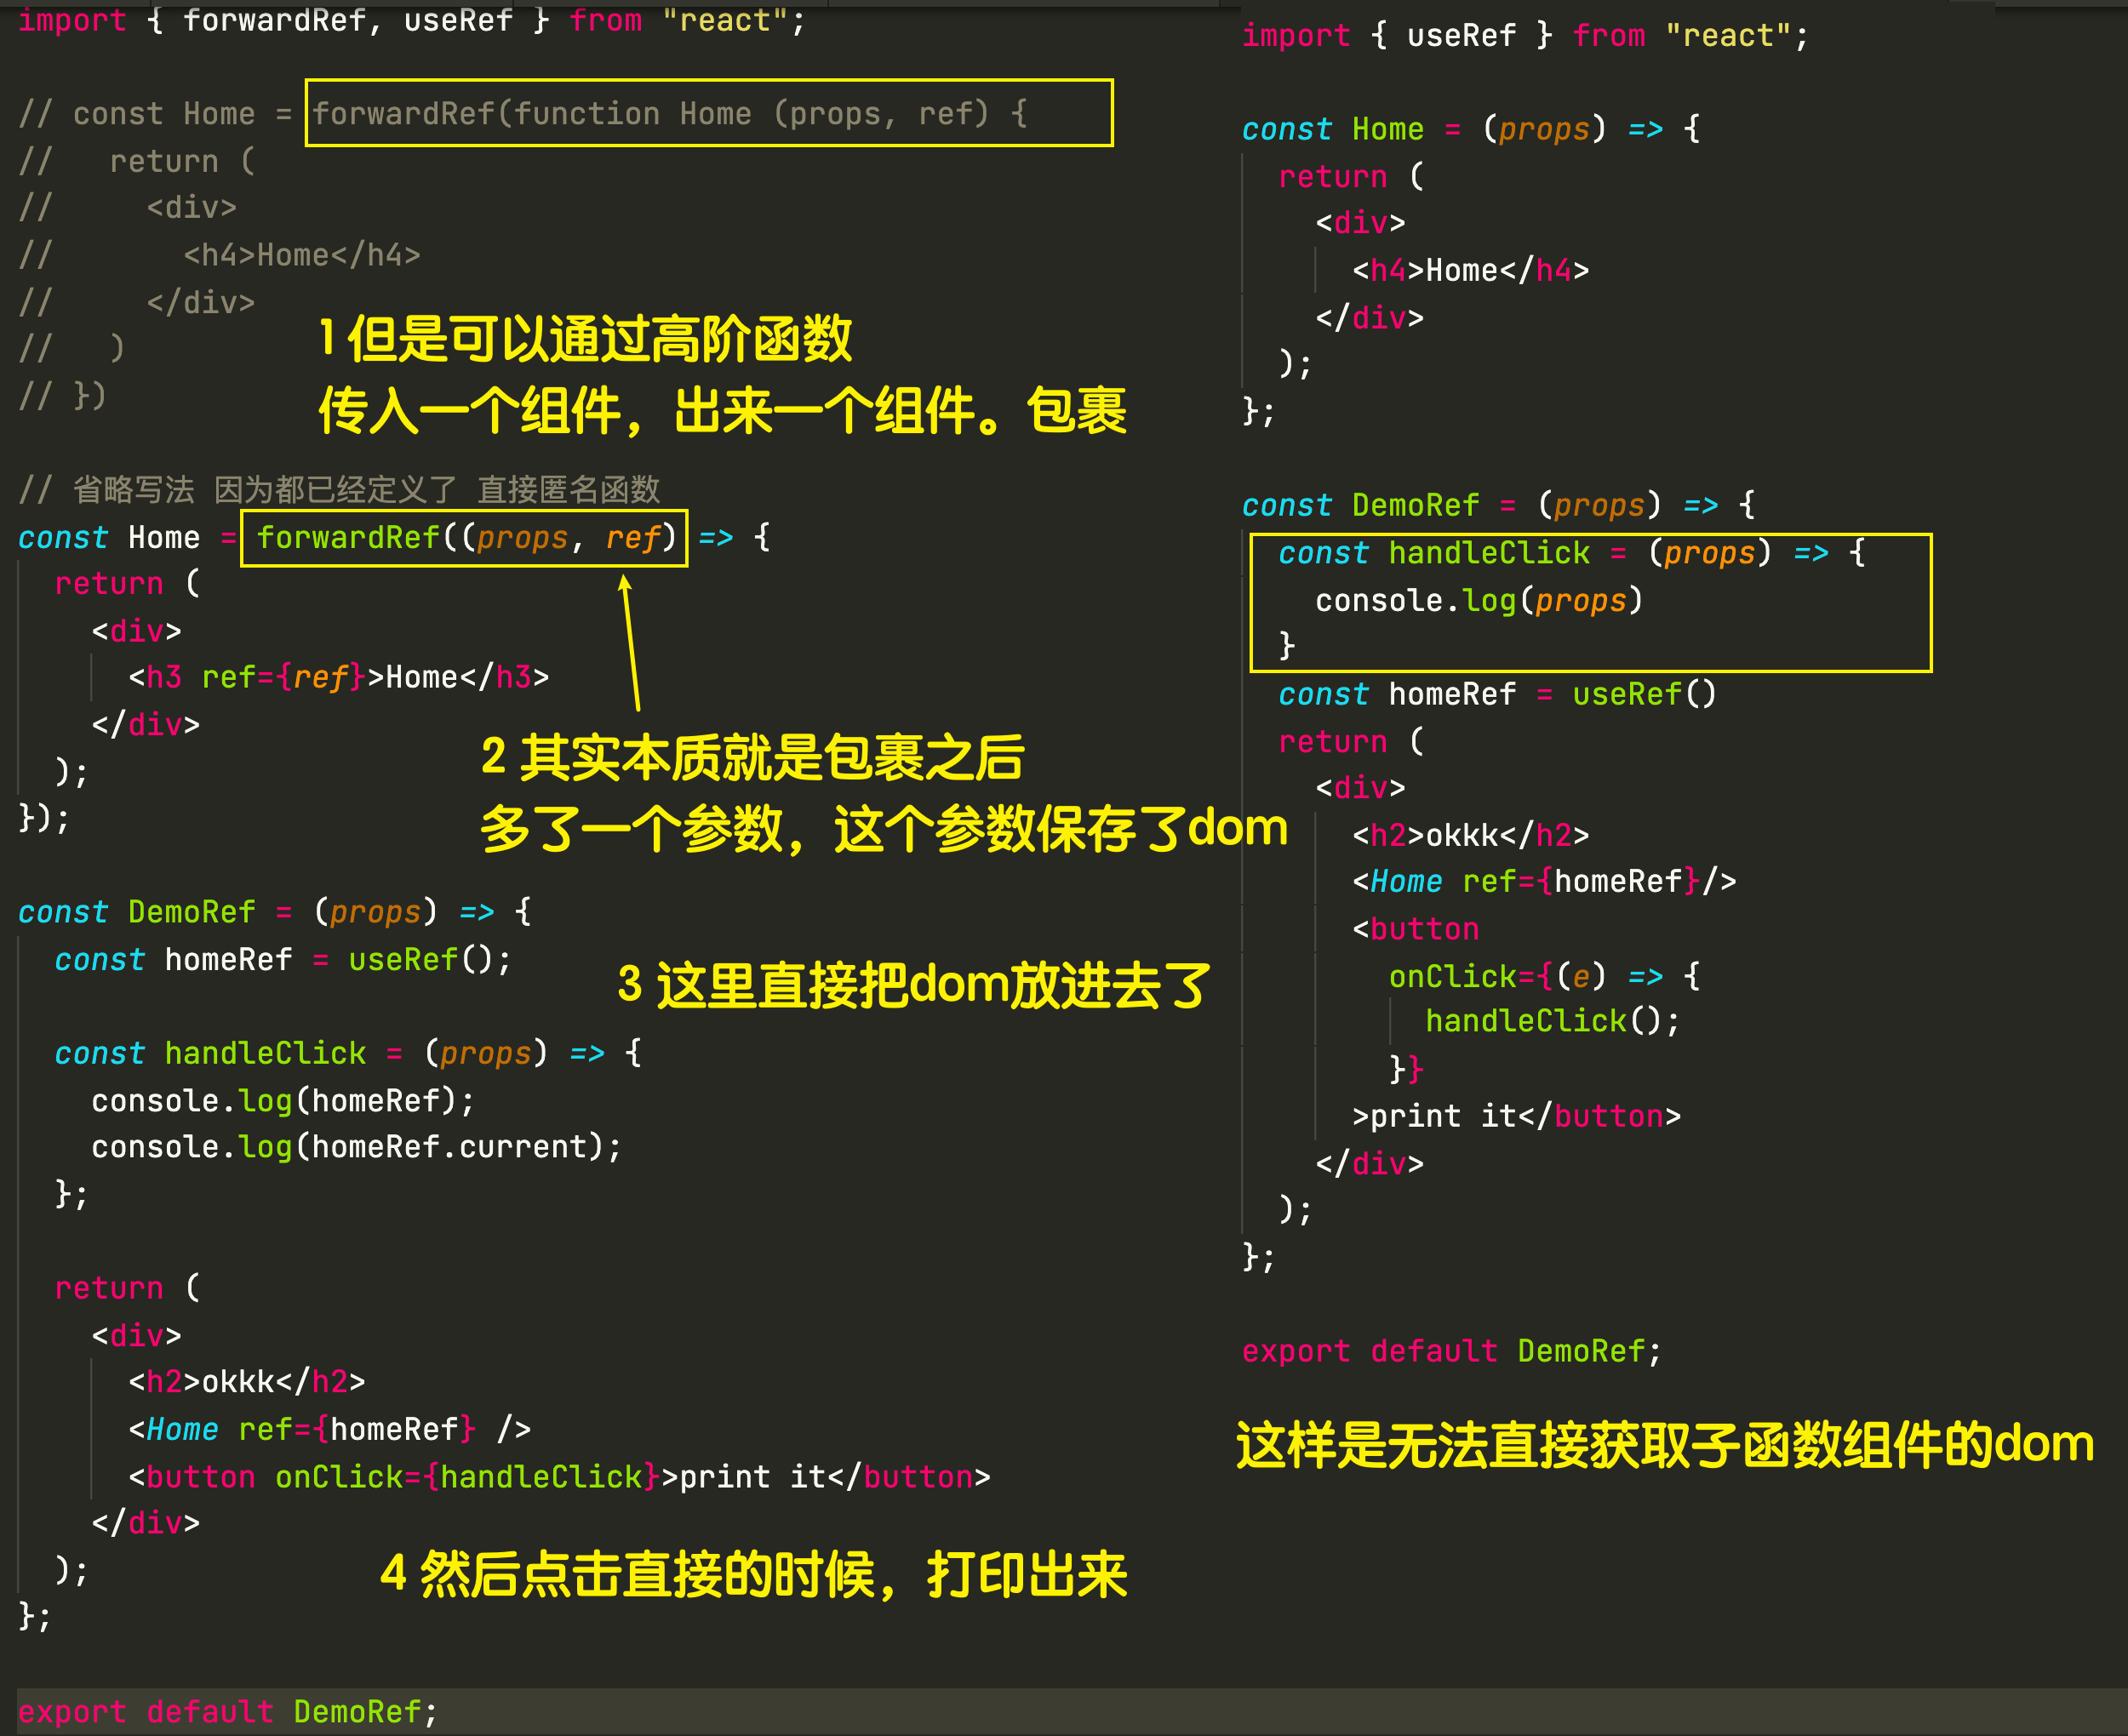
如何获取子组件的 dom?
这个初级有点难,可以不看。
答案就是一个高阶函数forwardRef()
这是一个高阶函数,传入一个组件,出来一个组件。出来之后这个组件拥有了一个强大的属性,那就是 ref!!你不是不让我自己搞吗?于是我自己搞!
ChatGPT
这个是基于 2025.2.21
state
这个都结合在 usestate 里讲解了
Props
React 组件中的数据传递属性(Props)详解
在 React 中,Props(Properties,属性) 是 组件之间传递数据的方式,类似于 HTML 标签的属性。Props 是只读的,意味着子组件无法直接修改 Props,只能由父组件控制。
1. Props 的基本使用
✅ 传递字符串、数字和布尔值
Props 作为 HTML 标签的属性传递给组件:
function Welcome(props) {
  return <h1>你好, {props.name}!</h1>;
}

function App() {
  return <Welcome name="小明" />;
}

export default App;
🔹 name 作为 props 传递到 Welcome 组件,在 JSX 里使用 {props.name}。
✅ 传递多个 Props
function UserInfo(props) {
  return (
    <div>
      <h2>姓名: {props.name}</h2>
      <p>年龄: {props.age}</p>
      <p>是否会员: {props.isMember ? '是' : '否'}</p>
    </div>
  );
}

function App() {
  return <UserInfo name="小明" age={25} isMember={true} />;
}

export default App;
🔹 传递的 props 类型可以是:
-
字符串(name="小明")
-
数字(age={25})
-
布尔值(isMember={true})
2. 传递对象、数组和函数
✅ 传递对象
function UserProfile(props) {
  return (
    <div>
      <h2>姓名: {props.user.name}</h2>
      <p>邮箱: {props.user.email}</p>
    </div>
  );
}

function App() {
  const userData = { name: '张三', email: 'zhangsan@example.com' };

  return <UserProfile user={userData} />;
}

export default App;
🔹 对象 userData 作为 props 传递,子组件通过 props.user.name 访问数据。
✅ 传递数组
function ItemList(props) {
  return (
    <ul>
      {props.items.map((item, index) => (
        <li key={index}>{item}</li>
      ))}
    </ul>
  );
}

function App() {
  const itemList = ['苹果', '香蕉', '橙子'];

  return <ItemList items={itemList} />;
}

export default App;
🔹 props.items 是数组,在子组件中用 .map() 遍历渲染列表。
✅ 传递函数
function Button(props) {
  return <button onClick={props.onClick}>点击我</button>;
}

function App() {
  const handleClick = () => {
    alert('按钮被点击!');
  };

  return <Button onClick={handleClick} />;
}

export default App;
🔹 父组件传递 handleClick 函数,子组件 Button 通过 props.onClick 绑定 onClick 事件。
3. Props 默认值(Default Props)
如果 Props 没有传递,可以设置默认值。
✅ 使用 defaultProps 设置默认值
function Welcome(props) {
  return <h1>你好, {props.name}!</h1>;
}

Welcome.defaultProps = {
  name: '游客',
};

function App() {
  return <Welcome />;
}

export default App;
🔹 如果 name 没有传递,默认值 "游客" 会被使用。
4. 使用 props.children 传递嵌套内容
✅ children 基本用法
props.children 可以用于传递 组件内部的内容:
function Card(props) {
  return <div className="card">{props.children}</div>;
}

function App() {
  return (
    <Card>
      <h2>标题</h2>
      <p>这是内容部分。</p>
    </Card>
  );
}

export default App;
🔹 props.children 包含 ,子组件 Card 通过 {props.children} 渲染 和
✅ 组合多个子元素
function Layout(props) {
  return (
    <div>
      <header>{props.header}</header>
      <main>{props.content}</main>
      <footer>{props.footer}</footer>
    </div>
  );
}

function App() {
  return (
    <Layout
      header={<h1>网站标题</h1>}
      content={<p>这里是主要内容。</p>}
      footer={<p>版权所有 © 2025</p>}
    />
  );
}

export default App;
🔹 可以传递 JSX 作为 props,使组件更具灵活性。
5. Props 结构赋值
为了让代码更简洁,可以使用 结构赋值 直接解构 props:
function UserProfile({ name, age }) {
  return (
    <div>
      <h2>姓名: {name}</h2>
      <p>年龄: {age}</p>
    </div>
  );
}

function App() {
  return <UserProfile name="李四" age={30} />;
}

export default App;
🔹 { name, age } 直接从 props 中解构,避免 props.name 和 props.age 过长。
6. Props 传递给多个组件
function User({ name, email }) {
  return (
    <div>
      <h3>{name}</h3>
      <p>{email}</p>
    </div>
  );
}

function UserList({ users }) {
  return (
    <div>
      {users.map((user, index) => (
        <User key={index} name={user.name} email={user.email} />
      ))}
    </div>
  );
}

function App() {
  const usersData = [
    { name: '小红', email: 'xiaohong@example.com' },
    { name: '小明', email: 'xiaoming@example.com' },
  ];

  return <UserList users={usersData} />;
}

export default App;
🔹 UserList 组件循环 users,然后把 name 和 email 传给 User 组件。
7. Props 是只读的
⚠️ 子组件不能直接修改 props,否则会报错!
function Counter(props) {
  props.count = 10; // ❌ 错误:props 不能被修改!
  return <p>计数值: {props.count}</p>;
}

function App() {
  return <Counter count={5} />;
}

export default App;
正确方式:
-
如果需要修改数据,应该由父组件传递一个函数,子组件调用它更新状态(提升状态)。
-
或者 子组件内部使用 useState 创建自己的状态。
总结
| 传递类型 | 示例 |
|---|---|
| 字符串 | name="小明" |
| 数字 | age= |
| 布尔值 | isMember= |
| 对象 | user= |
| 数组 | items= |
| 函数 | onClick= |
| children | |
| 默认值 | Component.defaultProps = |
掌握 Props,就能更灵活地传递数据,使组件更具复用性!🚀
Refs(References)
这个最新的也是要结合useRef()一起食用。不做赘述。
ref 的常见应用场景
✅ 获取输入框/按钮等 DOM 元素
const inputRef = useRef(null);
<input ref={inputRef} type="text" />;
✅ 存储不需要触发渲染的数据
const countRef = useRef(0);
countRef.current += 1;
✅ 调用子组件的方法
const childRef = useRef(null);
<Child ref={childRef} />;
childRef.current.someMethod();
✅ 动画 & 第三方库
const divRef = useRef(null);
divRef.current.scrollIntoView();
结论
1️⃣ useRef 主要用于获取 DOM 或存储数据,不会触发组件重新渲染。
2️⃣ React.createRef 适用于类组件,但新项目建议使用函数组件。
3️⃣ forwardRef + useImperativeHandle 用于让父组件操作子组件的方法。
4️⃣ ref 适用于:DOM 操作、存储数据、调用子组件方法,但 不应该用于状态管理。
共有评论(0)